Create an item in Microsoft Dynamics NAV 2015
In this tutorial we’ll show you how to create an item in Microsoft Dynamics NAV. For this example, we’re a furniture store but we just started selling coffee mugs so I need to create a standard coffee mug in NAV that we’re going to start shipping out.
Currently within the system, I’m in the role of the sales order processor but normally the sales department doesn’t deal with creating items but in this case they’ve asked me to take care of it because we need to urgently start stocking them and shipping them out.
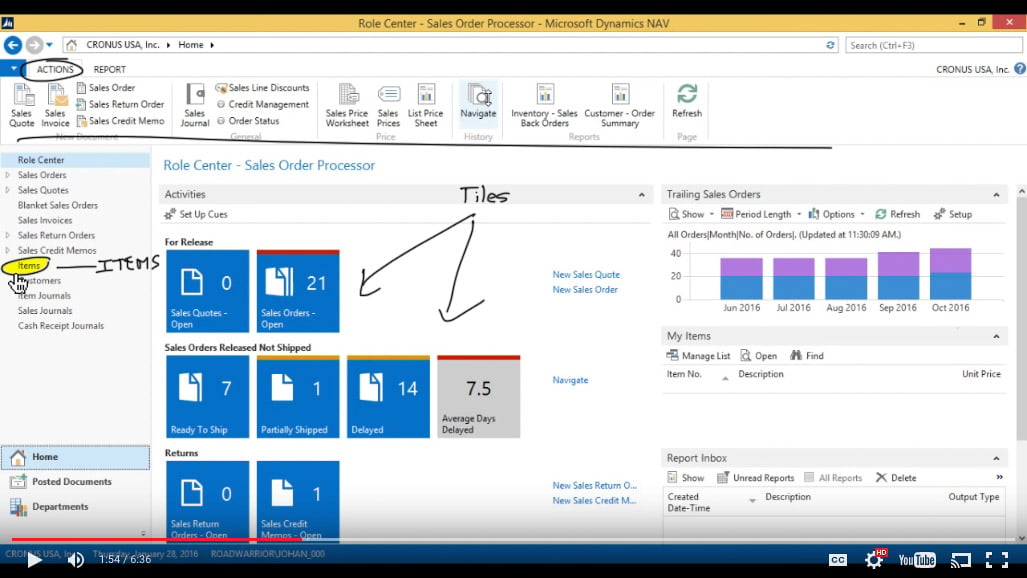
I’m logged in as the sales order processor and in the system I have my own role center. The system is role tailored so when I login I get only the things that I need to see as a sales processor.
Click on "Items" in the Role Center menu
I have my actions on top that are all sales related, I have my tiles that give me information about the status of things and on the side there’s a menu of things that I can quickly get to. One of them is “Items”.
(Click image to view larger version)
Creating a new item
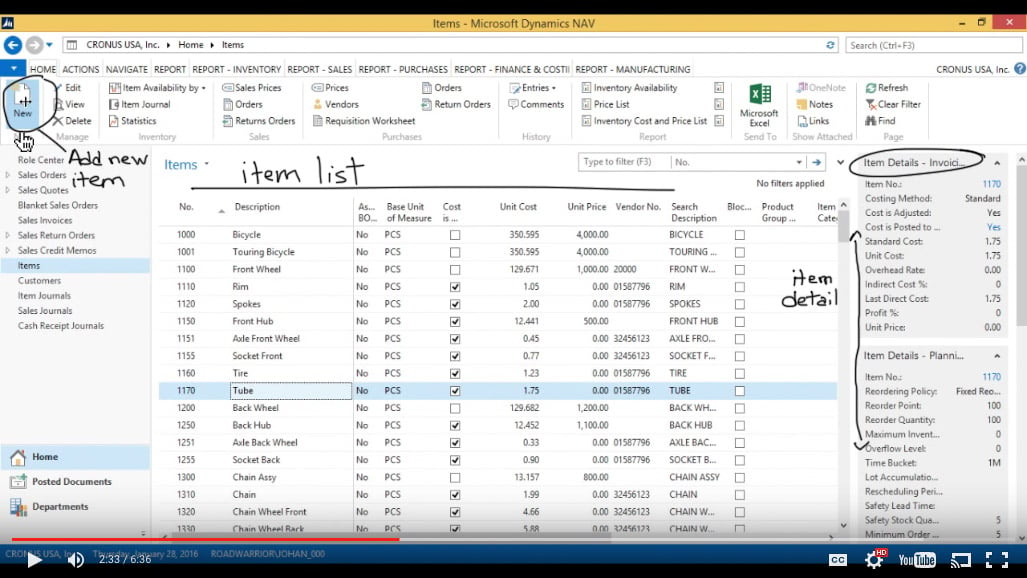
I need to create a new item so I go into the item list. That gives me a list of all items and you can see that’s an interactive list. The side fact boxes actually give me details on every single item as I click on them. What I want to do now is create a new item and just hit “new”.
(Click image to view larger version)
Entering an item Number
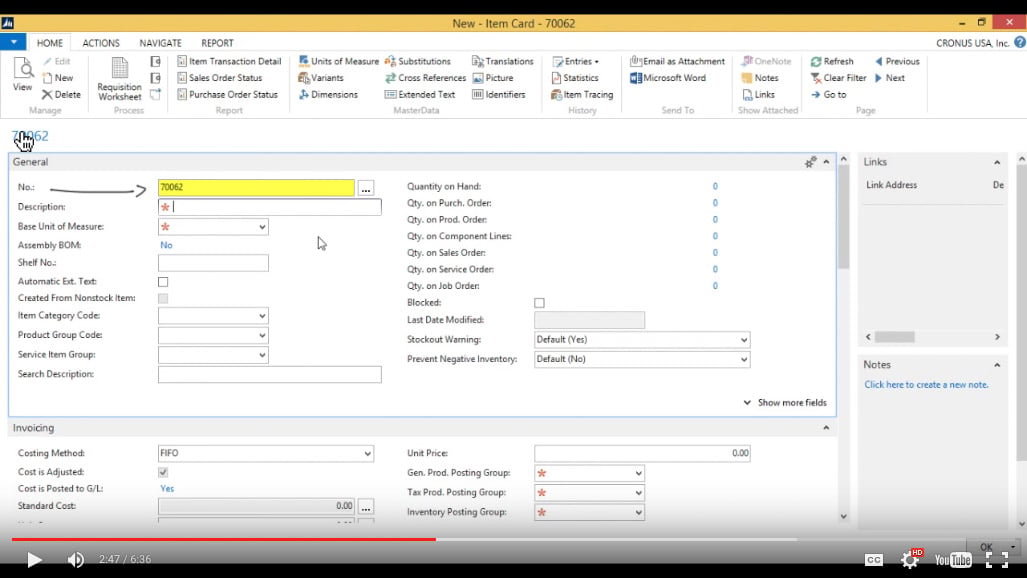
It then it asks me for a number. I like to sequentially number my items so I just want the system to pick a new number. I can do that by just hitting enter and the system automatically assigns the next number in the sequence.
(Click image to view larger version)
Entering the item Description
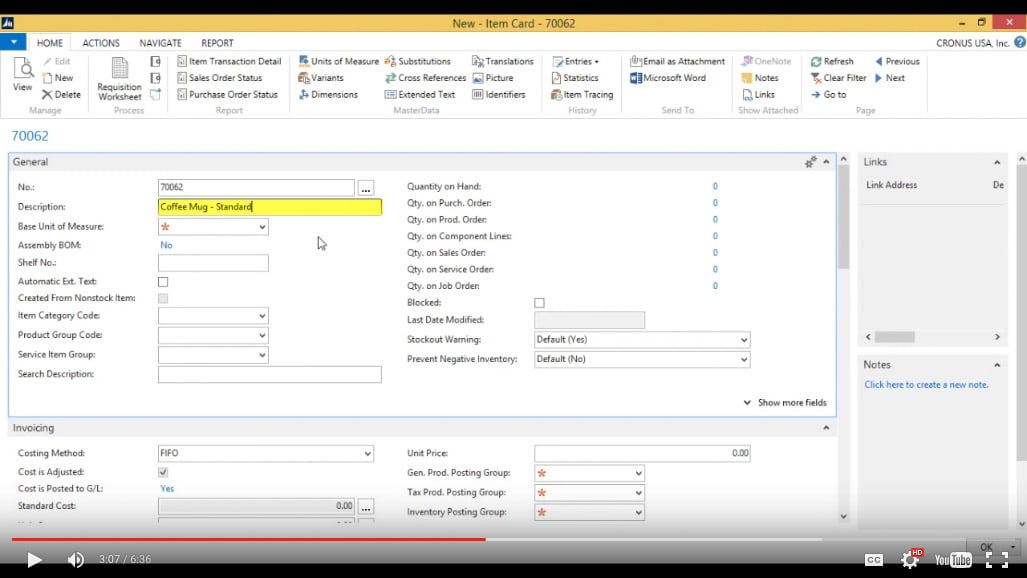
In this case the description is going to be “Coffee Mug - Standard”. I added “Standard” in this case because I might have different coffee mugs than “Standard”.
(Click image to view larger version)
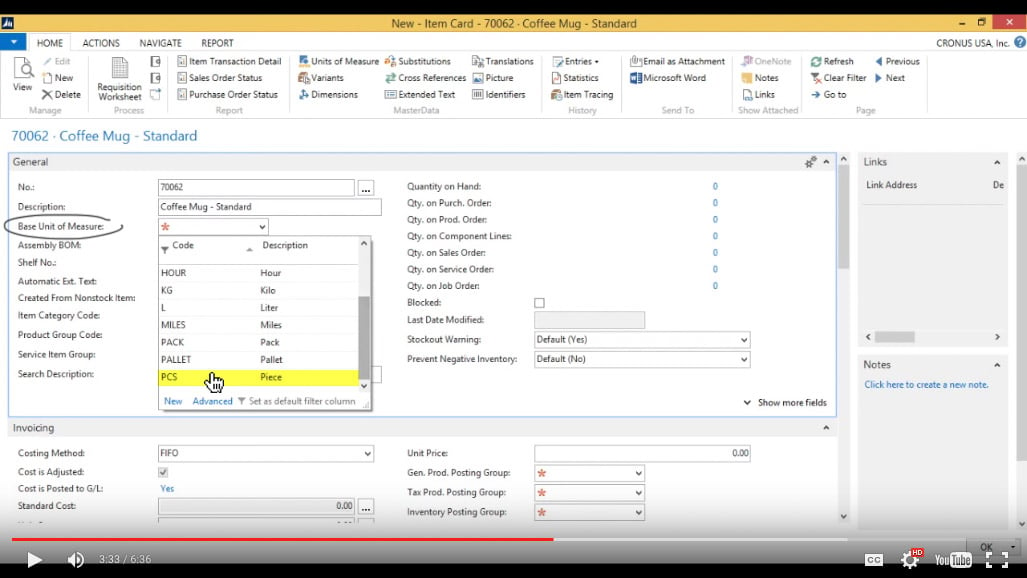
Selecting the Base Unit of Measure
Now I want to enter the base unit of measure. The base unit of measure is usually the smallest denomination that we trade in for a particular item. In this case, it would be 1 piece, so I select PCS (pieces) for the base unit of measure.
(Click image to view larger version)
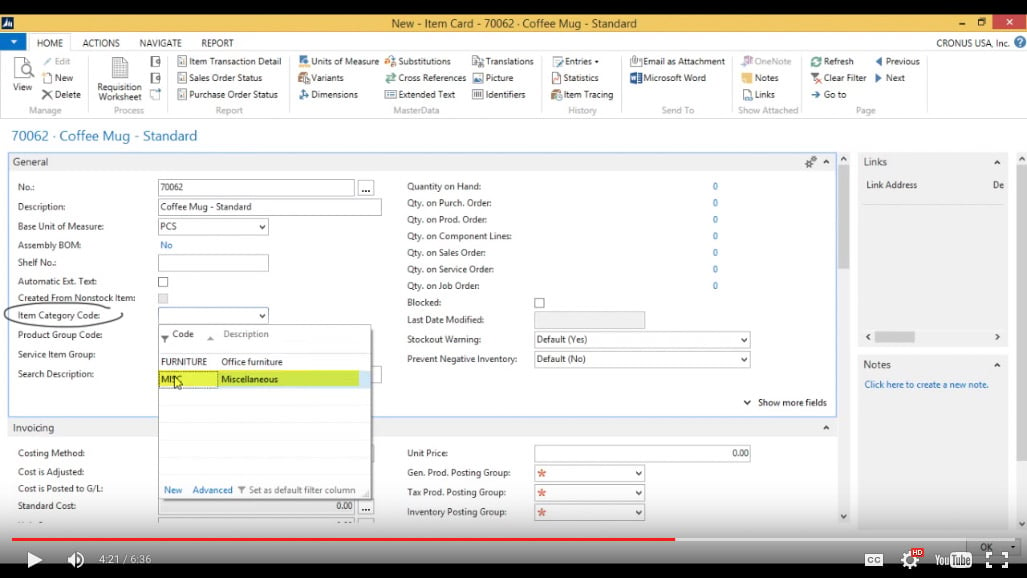
Selecting the Item Category Code
This is a furniture company so we’re going to have two options here, “furniture” or “miscellaneous”. In this case it’s “miscellaneous”. If we start selling a lot of coffee mugs in the future then we might actually want to expand this and create a separate category for “coffee mugs. For now, we’ll keep the item category code as “MISC” (miscellaneous).
(Click image to view larger version)
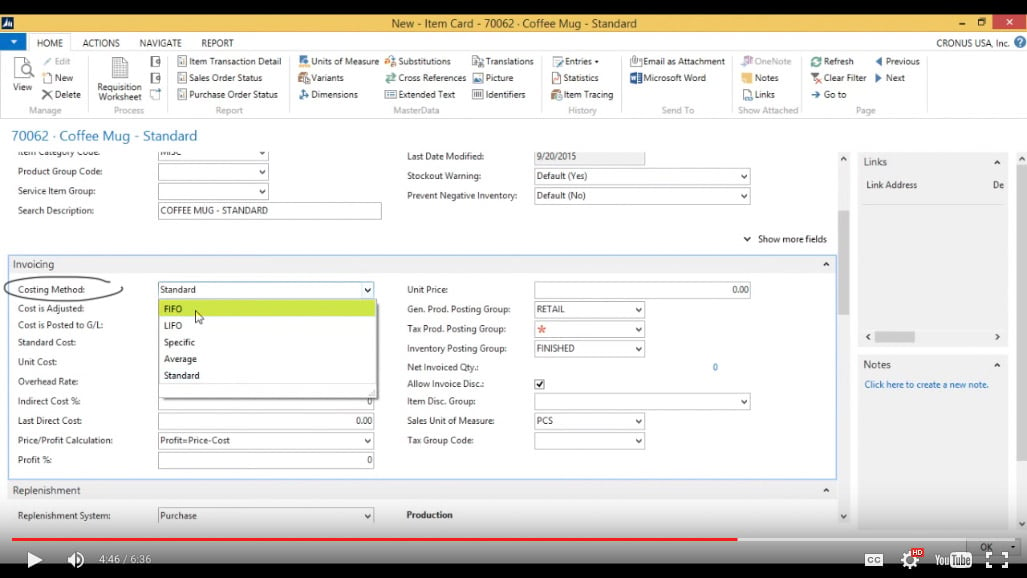
Selecting the Costing Method
When I go into the detail of the item, I can see that there are red stars where I need to go ahead and populate fields. In this case, on the invoicing side this is a standard cost item. I want to change the “Costing Method” to “FIFO” (first-in, first-out).
(Click image to view larger version)
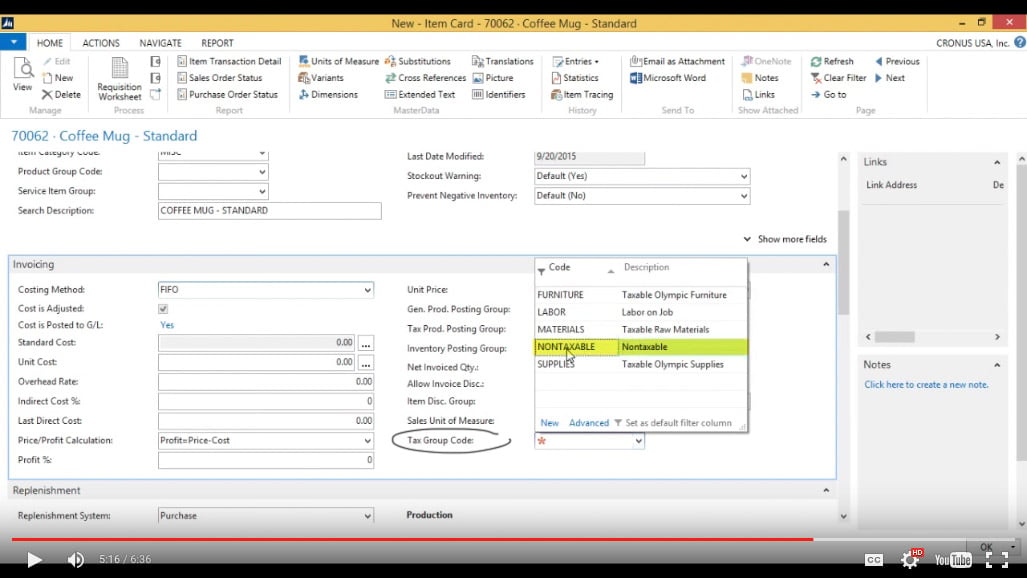
Choosing the Tax Group Code
It tells me that I need to put in the “Tax Product Posting Group”, which is slightly misleading because we only need this if we’re doing business with a VAT, as in Europe or Canada. But in the U.S. we use “Tax Group Code” not “Tax Product Posting Group”. So in “Tax Group Code” choose “NONTAXABLE”. In this case, choosing “NONTAXABLE” is just for simplicity. Obviously it’s probably going to be a taxable item most of the time unless there’s a tax certificate that the reseller has but for demonstration purposes we’re not concerned with setting up tax at this moment.
(Click image to view larger version)
Finalizing the new item
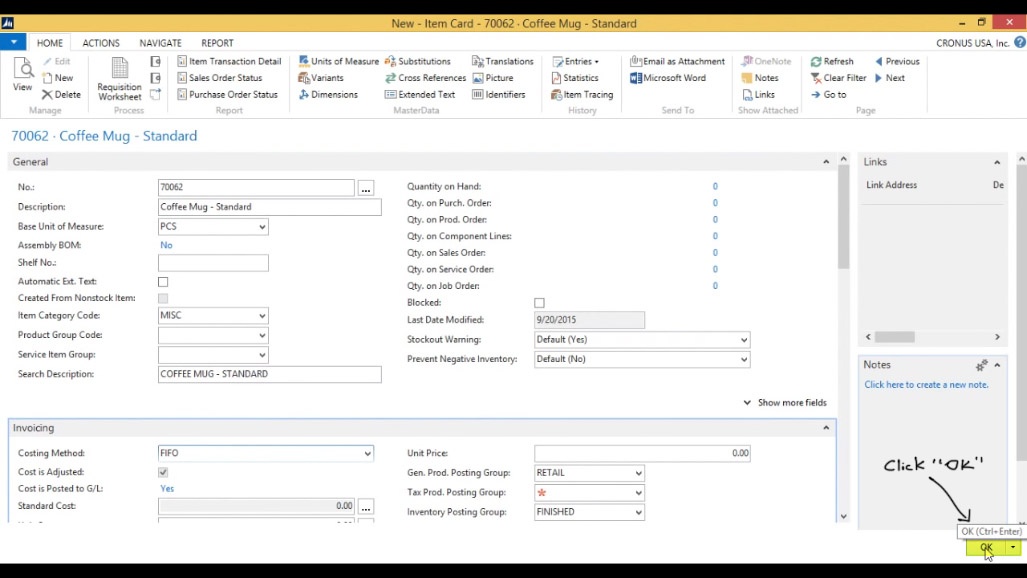
If you look at the other tabs there’s no other specific information that needs to be put in, so you should see no red stars.
So this is all we need to create our first item. The system automatically saves when you leave a field so there is no “Save” button. Just click “OK” to finalize the new item.
(Click image to view larger version)
Viewing your new item
You can take a look at the new item by filtering on it within your list of items. Just type “coffee” in the item filter field and it should show up. And that’s it!
You've learned some of the many ways your business can benefit from using inecta Food. It's trusted by other businesses in your industry and can work just as well (or better) for you. inecta Food is easy to implement. It's easy on your budget with monthly subscription payments. Take the next step to ensure your food business is running the right kind of business software. Software for your food safety, increased efficiency, and stronger revenue growth.
Curious about implementation costs, training, getting a customized demo & detailed estimate, booking a discovery call?

Global Headquarters:
225 Broadway #660,
New York, NY 10007
1-800-632-0573
©2023 INECTA LLC
Global Headquarters: 179 Franklin Street, New York, NY 10013
©2020 INECTA LLC